##Cryostorage for cell lines
This is one of the most important jobs you’ll do while you’re here: keeping track of and preserving your mammalian cell lines.
Like everything else, we have a Cryostorage spreadsheet (link found in the “Organization” channel of the lab Slack account). It is vital that you accurately describe the contents of a given tube on the spreadsheet. Include as much information as you can.
You should also include information about the LN2 tank, tower number, and slot where your cells are stored.
_Please do not store any cells beyond the 6 slot from the top_. The LN2 autofiller will often submerge the bottom few boxes in liquid nitrogen which can cause tubes to explode when thawing.
If you cannot find room for a new box, please let Morgan know and he’ll work with the LN2 facility to get more room for the lab. Cells can be temporarily stored at -80˚C under these circumstances.
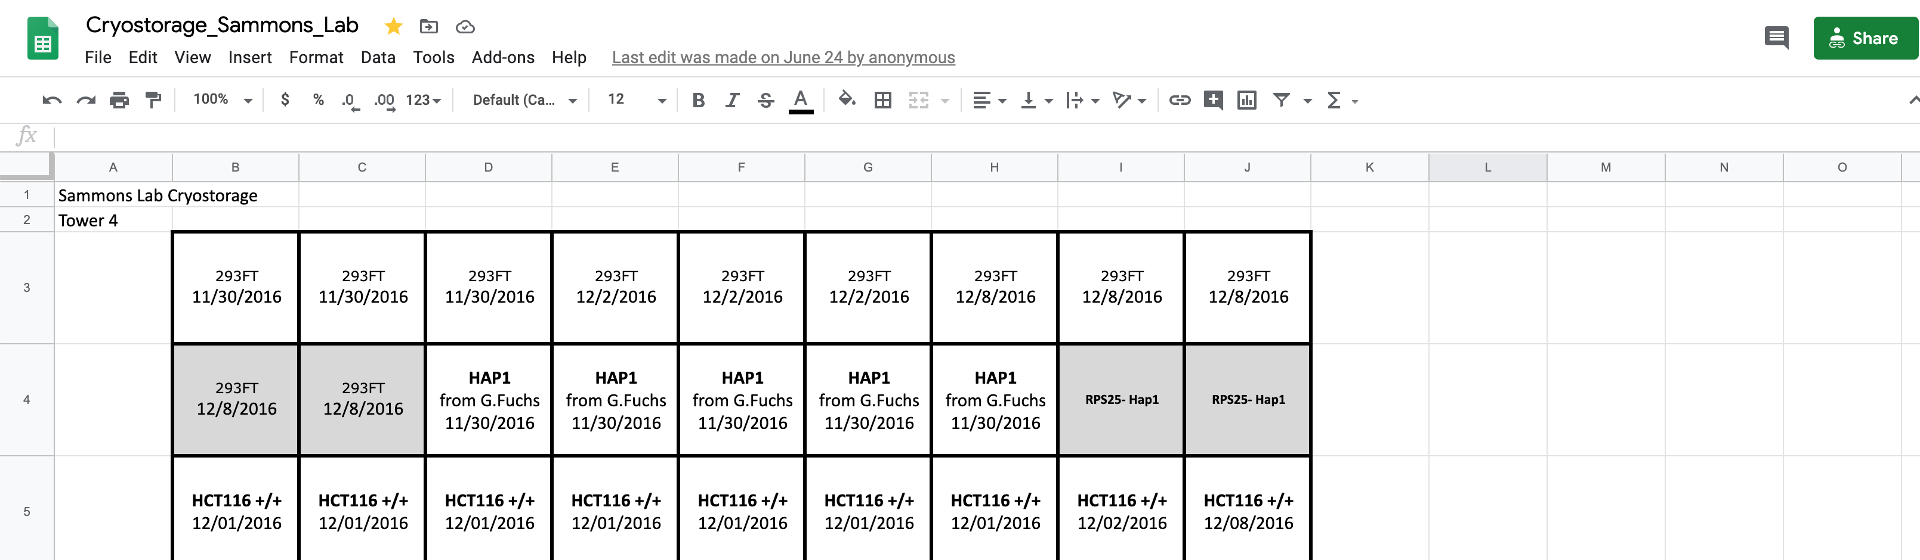
When you add a new cell line, put it on the spread sheet!!!
When you remove a cell line to thaw it, remove it from the spreadsheet!!!
##Plasmids We keep track of our plasmids using Google Sheets, a link to which can be found in the lab Slack “Organization” channel. If you need to be invited to either Slack or the Organization channel, please let Morgan know and he’ll help out.
When you make a plasmid, add it to the plasmid archive spreadsheet and include all of the information on the document. If there is no information for that particular plasmid (for example, in the Addgene column), put NA.
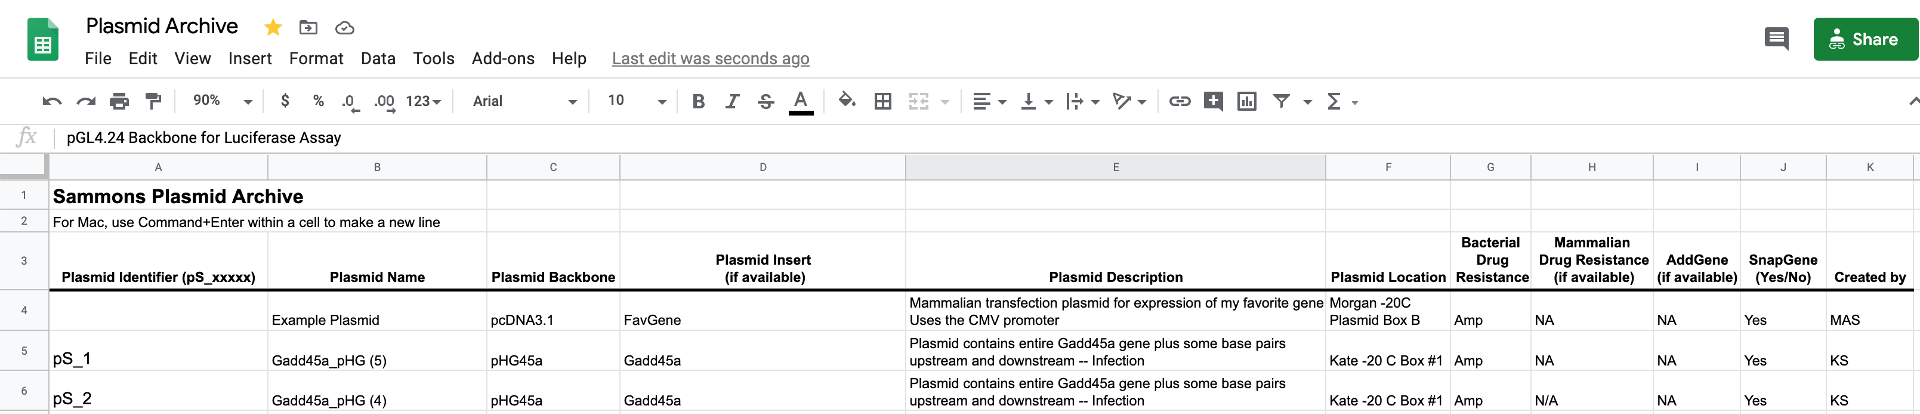
The first column of the spreadsheet is the Plasmid Identifier number, which is sequentially numbered. When you add something, generate the Plasmid Identifier by looking at what the last number is in the spreadsheet and give your plasmid the next number. It’s that easy! (Actually, it’s easier, Google Sheets will autogenerate the sequential numbers if you drag down from the previous cell).
Plasmids will be kept in your own personal archive and stored at -20˚C for long term storage. Keep a separate box/boxes for your plasmids. This will help everyone now and in the future.
You need to keep track of the contents of this archive such that all lab members can see what reagents we have available. All plasmids must be sequence verified before adding to the plasmid archive spreadsheet and (obviously) before they are used in any subsequent experiments.
###Snapgene and plasmid maps Every plasmid we create, obtain from Addgene, purchase, or get from another lab must have an associated Snapgene file/plasmid map if practical. If we make it or purchase it, this shouldn’t be an issue. You may have to work at it, but it is going to be better for you now and in the future. It’ll also help your lab mates and any future lab members who might want that information. The Snapgene website has a number of common plasmid backbones already annotated and ready to download (things like pcDNA3.1, pgL4.24, pUC18, etc). Addgene also has Snapgene-style plasmid maps available to download for almost all of their plasmids, meaning it should be very straightforward to modify them to include your changes.
Make your plasmid maps using Snapgene and annotate as best you can. Snapgene will automatically annotate common features (CMV promoter, primer binding sites, etc) but you should annotate anything that is novel or specific to just that plasmid. Primers used for cloning, PCR, etc should also be added to the plasmid map using Snapgene (and of course should be in the oligo spreadsheet).
After you make your Snapgene/plasmid map, you need to add that file to the repository (found in the plasmid_repository folder on Desktop of quark).
When adding the Snapgene file to the repository, please rename the file to match the Plasmid Identifier number so future you (or current Morgan) doesn’t have to try to decode whatever naming convention you use for yourself.
pS_1.dna
If the plasmid comes from another group and they send an old map picture or just give you written information about the plasmid, include as much information in the description field as you can that would help us in the future.
An example would be saying
“open reading frame inserted into the multiple cloning site of pUC18 between the NotI and XbaI restriction sites.”
##Oligos This section covers what to do when you order and receive non-renewable DNA or RNA oligonucleotides. Please see the Ordering page for information on ordering of DNA and RNA oligos.
If you receive oligos from IDT in single tube format (blue caps), add the oligo identifier number to the cap (format: SLXXXXX) In most cases, you’ll be resuspending the oligo at a concentration of 100 micromolar. Note on the tube if you changed this for any reason; if not, we’ll all assume it is 100 micromolar.
If you received oligos in a plate, resuspend to the appropriate concentration and place in a microcentrifuge tube and write the Oligo Identifier number and molarity on both the cap and the side of the tube. It is key that we do this, since we won’t have the IDT label to use as a crutch.
Oligo Identifier, sequences, and information about the oligo should already be in the Oligo Spreadsheet (link in the “Organization” channel of the lab Slack account). Make yourself a working stock of oligo, and put the long-term stock in the oligo boxes in the common -20˚C freezer. The boxes are labeled numerically based on the Oligo Identifier, so put it in the right box!!!
##Antibodies
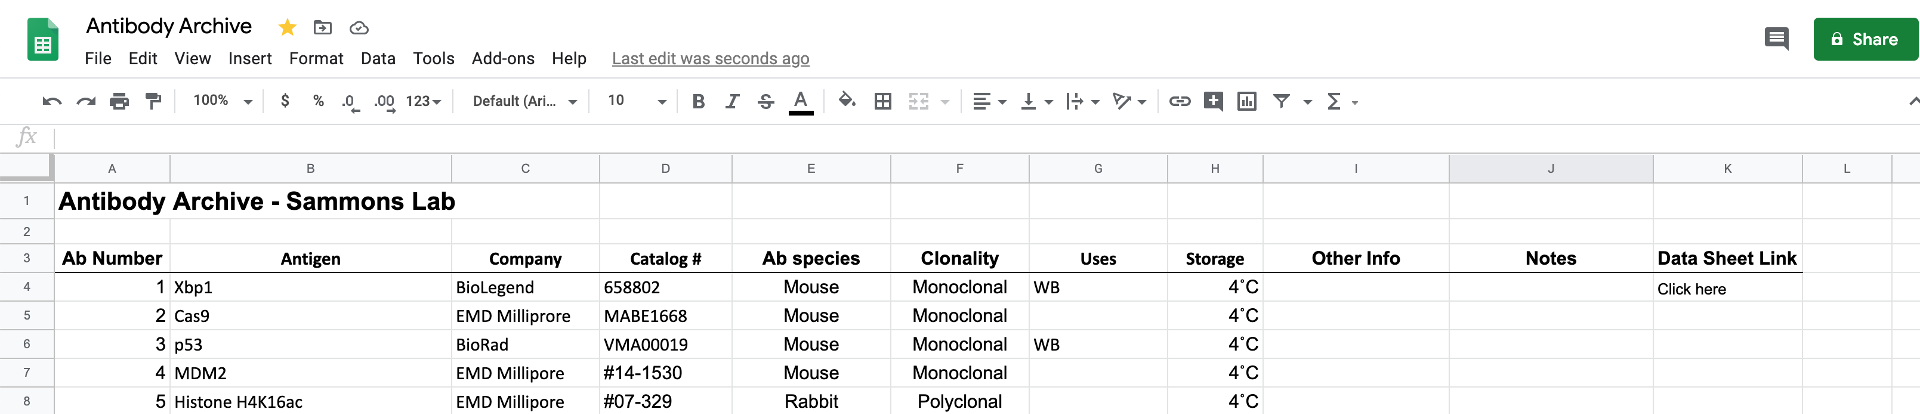
We pretty much only purchase antibodies and they are stored at either 4˚C or -20˚C. Please keep track of what antibodes we have by adding them to the Antibody Spreadsheet (link in the “Organization” channel of the lab Slack account). If you have ordered and received a new antibody, it gets an Ab Identifier number that is assigned sequentially. This is only important when keeping track of product sheets/inserts.
For each antibody you receive, add it to the spreadsheet and then drop a copy of the PDF product sheet in the antibody_repository folder (on the Desktop of quark). Name your file based on the Ab Identifier number (format: AB1.pdf)
When we recieve an antibody, please read the accompanying documentation and determine whether the antibody needs to be aliquoted in some way. Some antibodies are sensitive to multiple freeze-thaw cyles and will need to be properly aliquoted. Please use some semblance of logic if you do so; for example, if there is 50uL of antibody, you might want to do 5-10uL aliquots. Please label the tube with at least the antibody name (on the cap and side) and the product # (on the side). If you can fit more info, that’s fantastic.